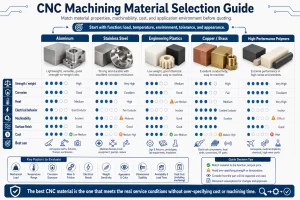
SLA 3D printing, also known as stereolithography, is a resin additive manufacturing process that uses focused ultraviolet light to cure liquid photopolymer resin layer by layer. Because the process can produce fine detail and smooth surfaces, it is often selected for prototypes, appearance models, small functional parts, and parts with engraved or embossed features.
Good SLA results still depend heavily on CAD design. Wall thickness, minimum holes, unsupported overhangs, assembly clearance, and raised or recessed details all need to respect the way resin cures, drains, and separates from supports. The following guide adapts the full useful source design rules into a practical English checklist for engineers preparing resin 3D printed parts.

What SLA 3D Printing Means for Part Design
In SLA printing, each layer is formed as ultraviolet light cures the cross-section of the model inside a resin vat. After one layer is cured, the build process repeats until the part is complete. This method can create fine geometry, but uncured resin, support marks, post-curing, and part orientation can all affect the final result.
For designers, that means SLA should not be treated as a process with unlimited feature freedom. Even when a CAD model looks correct on screen, features that are too thin, too small, too close together, or too difficult to drain may become fragile, blocked, fused, or hard to finish after printing.
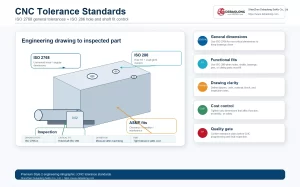
Build Size, Minimum Feature Size, and Tolerance
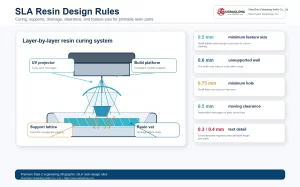
Available build size depends on the resin material and production equipment selected for the project. As a general design baseline, SLA can print small features down to about 0.5 mm, making it suitable for detailed prototypes and appearance parts.
A practical tolerance expectation is approximately +/-0.2%, with a minimum of about +/-0.2 mm. This is useful for early design planning, but final tolerance should still be reviewed against part size, material behavior, orientation, support contact, and the inspection requirement.
Wall Thickness
Unsupported SLA walls should normally be at least 0.6 mm thick. Thin unsupported walls can flex, warp, crack, or break during printing, cleaning, support removal, or post-curing.
Walls supported on both sides are less likely to deform, so the minimum thickness can often be reduced to about 0.4 mm. However, this should be used carefully. Larger unsupported surface areas, tall ribs, brittle resins, and parts that need handling strength may require thicker walls.
Overhangs and Support Planning
SLA printing commonly uses support structures. Slicing software usually identifies areas that need support and adds support geometry automatically, so many overhanging features can be printed successfully when support marks and finishing are acceptable.
If a feature must print without support, the unsupported overhang should normally stay below about 1 mm, and the minimum angle should be about 19 degrees. Longer unsupported features increase the risk of sagging, deformation, failed edges, or poor surface quality.
Hole Size and Long Channels
Small holes are easy to lose in resin printing because resin can remain inside the feature, and light curing may close or reduce the opening. To reduce blockage risk, holes should generally be at least 0.75 mm in diameter.
For channels or holes longer than about 12 mm, it is usually safer to increase the diameter. Long narrow channels are more difficult to drain and clean, so the CAD design should allow enough clearance for resin removal and post-processing.

Assembly Clearance
SLA can produce functional assemblies, but moving or connected components need enough clearance so that separate parts do not fuse into one rigid unit. For moving parts, a minimum clearance of about 0.5 mm is recommended.
For parts that are assembled or connected but do not need free motion, a smaller minimum clearance of about 0.2 mm may be acceptable. Designers should also consider resin type, part orientation, surface finish expectations, and whether the assembly will be cleaned, post-cured, or painted after printing.
Embossed and Engraved Details
SLA is well suited for raised and recessed details, including logos, labels, serial markings, and small text. To remain visible after printing and finishing, embossed details should normally be at least 0.3 mm high and 0.4 mm wide.
Engraved details should normally be at least 0.4 mm deep and 0.5 mm wide. If the detail is too small, it may fill with resin, soften during post-curing, or become difficult to read after surface finishing.
Practical SLA Design Checklist
- Use SLA when fine details, smooth surfaces, and accurate prototypes are important.
- Keep unsupported walls at or above 0.6 mm unless the geometry is well supported.
- Use at least 0.75 mm diameter for holes, and increase diameter for long channels.
- Plan overhangs around support needs, surface marks, and finishing requirements.
- Use at least 0.5 mm clearance for moving parts and 0.2 mm for non-moving assembly connections.
- Make embossed and engraved details large enough to survive printing and post-processing.
When to Use SLA for Prototyping
SLA is a strong choice when the project requires fine surface detail, clean appearance, small text, complex shapes, or quick design validation. It is especially useful for appearance prototypes, ergonomic models, transparent or special resin parts, and components that need visual review before production tooling.
For projects that require stronger engineering plastics, high-temperature performance, or production-grade mechanical behavior, compare SLA with other 3D printing material options and production processes. If the part will later move to machining or molding, early DFM review can help avoid redesign work.
How DEBAOLONG Supports Resin 3D Printed Parts
DEBAOLONG supports prototype and low-volume manufacturing projects across 3D printing, CNC machining, sheet metal fabrication, injection molding, and related manufacturing services. For SLA-style resin parts, our team can help review feature size, wall thickness, clearance, appearance requirements, and the best path from prototype to production.
FAQ
What is the minimum wall thickness for SLA 3D printing?
A practical minimum is about 0.6 mm for unsupported walls and about 0.4 mm for walls supported on both sides, depending on resin, geometry, and part size.
Can SLA print functional assemblies?
Yes, but moving parts need clearance. A practical minimum is about 0.5 mm for moving parts and about 0.2 mm for assembly connections that do not need free motion.
What hole size should I use for SLA printed parts?
Use at least 0.75 mm as a baseline. For long holes or channels, increase the diameter to improve resin drainage and reduce blockage risk.